HTML Forms Tutorial
HTML forms are an important part of making websites, letting users do things on the internet, send information, and give their thoughts.
Keep in mind that the examples you see on this page look a certain way because of my CSS. If you try them, they might look different.
HTML Form Structure
A basic HTML form consists of the following components.
<form action="process.php" method="POST">
    <!-- Form elements go here -->
    <input type="text" name="username" id="username" placeholder="Username" required>
    <input type="password" name="password" id="password" placeholder="Password" required>
    <input type="submit" value="Submit">
</form>
- <form>: The form element that contains all form controls.
- action: The URL where the form data is sent for processing (typically a server-side script).
- method: The HTTP method (GET or POST) used to send data.
Form Controls
HTML offers various form controls for collecting user input.
- Text fields: <input type="text">
- Password fields: <input type="password">
- Textareas: <textarea></textarea>
- Radio buttons: <input type="radio">
- Checkboxes: <input type="checkbox">
- Select dropdowns: <select></select>
Labels and IDs
- Labels improve the accessibility and usability of your forms.
- hey should be associated with form controls using the for attribute and matching id attributes.
<label for="username">Username:</label>
<input type="text" name="username" id="username">
Placeholder Text
- Use the placeholder attribute to provide hints or examples for users within form controls
<input type="text" placeholder="Enter your name" name="name" id="name">
Required Fields
- Use the required attribute to make a field mandatory.
- The browser will prevent submission until all required fields are filled.
Validation
- You can use HTML5 input attributes like type="email", type="number", and pattern to enforce data formats and validate input.
<input type="email" name="email" id="email" required>
<input type="number" name="age" id="age" min="0" max="120">
<input type="text" pattern="[A-Za-z]{3}">
Fieldset and Legend
- To group related form controls, use the <fieldset> and <legend> elements
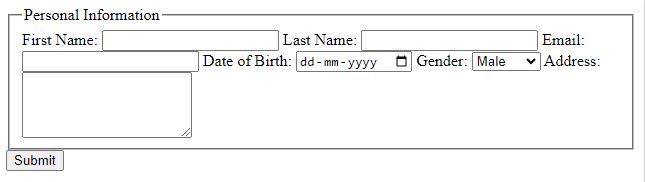
<fieldset>
  <legend>Personal Information</legend>

  <label for="firstName">First Name:</label>
  <input type="text" id="firstName" name="firstName" required>

  <label for="lastName">Last Name:</label>
  <input type="text" id="lastName" name="lastName" required>

  <label for="email">Email:</label>
  <input type="email" id="email" name="email" required>

  <label for="dob">Date of Birth:</label>
  <input type="date" id="dob" name="dob" required>

  <label for="gender">Gender:</label>
  <select id="gender" name="gender" required>
      <option value="male">Male</option>
      <option value="female">Female</option>
      <option value="other">Other</option>
  </select>

  <label for="address">Address:</label>
  <textarea id="address" name="address" rows="4" required></textarea>

</fieldset>

<button type="submit">Submit</button>
Multiple-Choice
- You can create radio buttons, checkboxes, and select options to allow users to make multiple choices
<input type="radio" name="gender" value="male"> Male
<input type="radio" name="gender" value="female"> Female
<input type="checkbox" name="interest" value="sports"> Sports
<input type="checkbox" name="interest" value="music"> Music

<select name="country">
    <option value="usa">United States</option>
    <option value="canada">Canada</option>
</select>
File Upload
Use the <input type="file"> control to allow users to upload files
<input type="file" name="file_upload">